Epoxy Injection of Structures Part 3

February 24, 2017

This is the third in a series on Infrastructure Repairs Using Epoxy. Part One is  Introduction to Epoxy Injection.  Part 2 is Crack Analysis Before Epoxy Injection

If your have not read that yet you may want to go back and read it before you proceed with reading this.

Port Setting

It is extremely important that if drilling to use the right tool. to set drill type ports use a vacuum swivel drill. That is a drill with vacuum attached swivel drill chuck and hollow a drill bit.

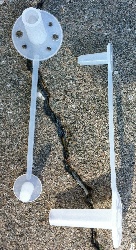
Concrete dust can be detrimental to the injection processes in several ways. Any dust remaining in the drill hole near a crack can combine with the very low viscosity injection resin. This thickens your resin turning it into a weak paste. This paste can slow or even block the resin flow. Drilling very tight crack with a solid drill forces dust into the crack. This seals the crack from resin flow. Do not allow shortcuts in the drilling procedures!  However, for most applications the surface port is the easiest and most effective method.Epoxy Injection Surface Port
Port Spacing

Determining the spacing of ports is done by a highly experience applicator. This spacing is a factor of the tightness of the crack and the depth of the concrete substrate. Spacing is normally between four (4) and eight (8) inches.

Port Setting and Sealing

Align ports directly over cracks. That allows injection resin to flow into the crack. Seal surface cracks. Sealing the exterior of cracks is done with Epoxy Gel type Bonder.

Testing The System

Test cracks that are ill defined, or if dust or debris is in the crack. This testing may be done by injecting water into the crack area.

Water left in the cracks will not effect the injection process or the curing of the Epoxy.com Injection Resin. Heavier injection resin forces the water out the cracks. Water injection helps clean the cracked areas. More important, is that it helps avoid the unexpected. This process of flushing the cracks is commonly skipped by more experience contractors, who can tell if there will be a flow of resin, by just looking at them. However, when in doubt water testing is a must.

If the cracks contain algae, chlorinated water containing copper sulfate is injected. After pumping this mixture is left over night. The next morning the crack is flushed by pumping fresh water, into it. This flushes it out before resin injection begins.

Efflorescence builds up on the bottom of a crack in a horizontal slab. Water in the crack extracting soluble calcium hydroxide is the cause. The water evaporates at the surface leaving the lime, which later reacts with the carbon dioxide in the air to form limestone. The inside of the crack, is frequently free of limestone and making it suitable for injection.

Part 4 of this series: Injection Resin Materials Product Selection.

For more information visit our website at http://www.epoxy.com, email us at info@epoxy.com or call our technical service department at +1 (352) 533-2167.


Epoxy River Simulation

November 16, 2016

How to Simulate a River Bed in Epoxy


A customer asks, “I recently saw what looks like a creek bed built out of epoxy with stones in it. How is this done in epoxy?”

Here are the steps to do it:

  1. Choose your stone. The stone that you choose can be uniform in size or a blend of stone sizes and shapes.  If bigger stone is going to be used, it is recommended that you use a blend of larger stone with smaller stone.  Variations in shape will also help to increase the amount of surface area holding the system together, making it stronger. Be sure the stone is clean and completely dry before attempting any of the steps below.
  2. Make a mock-up of the complete system below in a small box made out of plywood or similar material. This will verify everything from stone selection, to aesthetics, to stone durability. It is also gives you a chance to practice your procedure,and get additional phone tech support from us if required before you proceed with your project.
  3. Construct the recessed area that your river will “flow”. That could be a recessed area in a concrete floor, a wooded shadow box or some other “box” to hold your river. Be sure the box is watertight and that the surface is properly prepared before proceeding –www.epoxy.com/surfaceprep.aspx
  4. Prime the area created in step 3 with Epoxy.com Product #12 – www.epoxy.com/12.aspx at a rate of 250-300SF per gallon.  Allow to cure until hard to the touch, typically 6-8 hours
  5. After the Primer in Step 4 is hard to the touch and before 24 hours has passed, apply a coat of Epoxy.com Product #1 – http://www.epoxy.com/1.aspx – 100% solids General Purpose Epoxy Coating to the bottom of the box created in Step 3.  This will help to give you a consistent background color. Black helps give you the illusion of infinite depth.
    1. Optionally you can add a second coat of the #1 Pigmented Epoxy Coating to increase color intensity.
    2. On the other hand if the stone in Step 6 is so deep that you will not be able to see through it you can skip this step and proceed to step 6.
    3. Allow the epoxy in Step 5 to cure hard to the touch before proceeding, typically 10-12 hours.  Do not wait more than 24 hours before moving on to Step 6.
  6. Properly mix Epoxy.com Product #17 – www.epoxy.com/17.aspx – Epoxy Stone Adhesive Part A and Part B. Add your stone into the mixed stone adhesive.  The amount of stone that you will be able to add to it will vary depending on size and how clean the stone is.  100 lbs per 3 quart batch (2 QT “A” and 1 QT “B”) is a good starting point.  This ratio should be verified in a mockup before proceeding to this step. Mix in the stone until a uniform shine can be see on all the stone. Install this mix into your “box” at the desired thickness. Be sure to pack it in tightly and level to the desired surface.  Allow to harden overnight. Do not wait more than 24 hours before moving on to Step 7.
  7. Properly mix and pour Epoxy.com Product #214 – www.epoxy.com/214.aspx – Table Top and Casting Epoxy into the spaces between the rock in step 6. You typically will want to pour a minimum of 1/8 inch or not more than 1/2 inch at a time.  Take care to break any bubbles as you go early and often.  This is typically easy to do using a hair dryer and/or Isopropyl (rubbing alcohol mist). Allow each layer to harden and cool before adding another lift.  Never wait more than 24 hours in between coats and/or pours of epoxy.

When you complete this project it will look like a stone riverbed filled with \ water.  You can also experiment with other objects in your stone mix.  Contact Epoxy.com Technical Support with your questions: info@epoxy.com or 352-533-2167


Monument Repairs with Epoxy

March 9, 2016

A technician who uses a non-Epoxy.com product to repair tombstones wrote me recently looking for help with problems that he was having. He goes on to say that the epoxy that he uses never fails, but rather the stone fails. When a secondary break occurs, the stone always re-breaks about 2 mm (about ¾ inch) above or below the epoxy joint. The epoxy attached to about 2 mm of the stone and holds well.

He asked me if the epoxy shrinks so much that it will ‘ pull away ‘ from the stone it’s attached to, and in his case, it pulls about 2mm of stone with it.

No I doubt it is epoxy shrinkage causing the problem. High quality epoxy has little or no shrinkage. It would have to be a very poor quality epoxy to be shrinking enough to do that.

The reason his epoxy is not working is that it is too rigid. His existing rigid material has a “high modulus of elasticity”. A material with “high modulus of elasticity” is a material that is stiff and/or rigid. A “low modulus of elasticity” material is semi-flexible, and is not rigid or brittle.

T pieces of the stone structure (in this case a tombstone) and pieces not in touch with the ground tend to get hotter and cooler faster than the larger pieces and pieces with ground contact. This is called “differential timing of the event”. For example the top of a tombstone can be heated and cooled on 5 sides, the top and the 4 sides. The base of the tombstone which is buried in the ground has earth or stone on all of its surfaces. This earth and stone tends to keep the temperature of the base more stable by insulating it and slowing the change in temperature. This works much like the insulation in your house slows temperature changes inside your house.

When an object like a piece of stone is heated it expands (gets bigger). When an object cools it contracts (gets smaller). For example 100 feet of concrete will be 1 inch longer once it is heated 100 degrees F. That is why expansion joints are cut into concrete.

In the case of tombstones all the pieces of the same type of stone have very similar if not identical “coefficient of expansion”. Since the pieces are positioned with potentially different timing of heating and cooling there is a “differential timing of the event” (see above). The result is stress areas you are seeing in the closest weakened plane in the stone near the bond line.

Product #2005 was specifically designed for tombstone (monuments) and/or stone bonding, or repair. Epoxy.com Product #2005 is very strong yet it is has a “low modulus of elasticity” (semi-flexible). The low-modulus of elasticity helps to absorb differential movement (two sections of stone heating and cooling at different times), making it much less likely to cause a stress area in adjacent weakened planes.

Camouflage the bond line rubbing stone dust(ground off the original stone or a similar colored stone) into any exposed epoxy material while the epoxy is still “wet”. That way the dust will stick in the wet epoxy making the epoxy difficult to impossible to see.

Please send your additional question and blog ideas to norm@epoxy.com


Waterproofing of Leaking Foundations

May 4, 2015

This is the time of year when the ground thaws and basements leak. If you are one of those building owners, here are some earlier posts that you will find useful.

  1. https://news.epoxy.com/2014/09/04/epoxy-waterproof-block-wall-foundation/
  2. https://news.epoxy.com/2014/09/15/shows-how-to-identify-leaks-that-need-waterproofing-in-basement-walls-and-floors-that-are-made-out-of-poured-concrete-part-2b-will-deal-with-the-actual-repairs-to-poured-concrete-leaks/
  3. https://news.epoxy.com/2014/09/18/epoxy-injection-repairs-of-cracks-in-poured-concrete/